|

目标
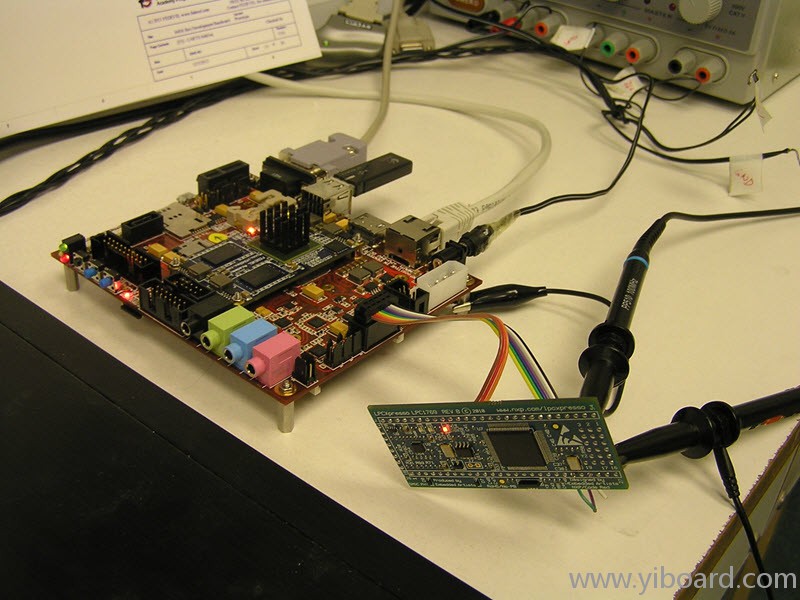
我们的目标是,通过将LPC1769连接到iMX6的方式,使得我们能够可以直接从运行在Rex上的Linux更新微控制器的固件。
硬件连接 为了方便测试,我们使用的是LCPXpresso开发板,按以下方式连接到iMX6 Rex开发板:
iMX6 Rex LPCXpresso
UART2_RXD (J31 pin 3) <<<< TXD (J6 pin 21)
UART2_TXD (J31 pin 5) >>>> RXD (J6 pin 22)
GPIO 2 (J34 pin 4) >>>> ISP# (J6 pin 51)
GPIO 3 (J34 pin 5) >>>> RST# (J6 pin 4)
GND (J31 pin 9) - – - - GND (J6 pin 1)
+3.3V (J31 pin 10) - – - - +3.3V (J6 pin 28)
软件 - lpc21isp 原版的lpc21isp代码在Linux下运行会有一些问题,因此我们使用的是Senseg版本。 为了修复“error: ‘ISP_ENVIRONMENT’ has no member named ‘ProgramChip’ while compiling the code”,使用以下方式更新 lpc21isp.h文件: - //#if defined(_WIN32) && !defined(__CYGWIN__)
- //#define COMPILE_FOR_WINDOWS
- //#define COMPILED_FOR "Windows"
- //#elif defined(__CYGWIN__)
- //#define COMPILE_FOR_CYGWIN
- //#define COMPILED_FOR "Cygwin"
- //#elif (defined(__arm__) || defined(__thumb__)) && (!defined(__raspi__))
- //#define COMPILE_FOR_LPC21
- //#define COMPILED_FOR "ARM"
- //#define printf iprintf
- //#elif defined(__APPLE__)
- //#define COMPILE_FOR_LINUX
- //#define COMPILED_FOR "Apple MacOS X"
- //#elif defined(__FreeBSD__)
- //#define COMPILE_FOR_LINUX
- //#define COMPILED_FOR "FreeBSD"
- //#elif defined(__OpenBSD__)
- //#define COMPILE_FOR_LINUX
- //#define COMPILED_FOR "OpenBSD"
- //#else
- #define COMPILE_FOR_LINUX
- #define COMPILED_FOR "Linux"
- //#endif
同步也有一点问题,因此我们必须将lpcprog.c(ReceiveComPort函数)更改如下: - } while (((*RealSize) < MaxSize) && (SerialTimeoutCheck(IspEnvironment) == 0) && (nr_of_0x0A < WantedNr0x0A) && !eof);
然后只需要编译一下。 - $ make -f Makefile clean all
烧写过程 为了将RESET和ISP设成低电平(我们已经将这两个信号接到GPIO扩展接口),我们使用i2cset命令: - $ i2cset 1 0x27 0x02 0xF3 // set GPIO 0.2 and GPIO 0.3 to low
- $ i2cset 1 0x27 0x06 0xF3 // set GPIO 0.2 and GPIO 0.3 as output
将RESET变为高电平: - $ i2cset 1 0x27 0x02 0xFB // set GPIO 0.3 to high
现在NXP微控制器处于ISP模式。运行lpc21isp工具: - $ ./lpc21isp -bin blink.bin /dev/ttymxc1 115200 12000
- lpc21isp version 1.83
- File blink.bin:
- loaded...
- image size : 10548
- Image size : 10548
- Synchronizing (ESC to abort).Answer Synchronized
-
- String:53 79 6E 63 68 72 6F 6E 69 7A 65 64 D A 0 OK
- Read bootcode version: 2
- 4
- Read part ID: LPC1769, 512 kiB ROM / 64 kiB SRAM (0x26113F37)
- Read Unique ID:
- succeeded
- Will start programming at Sector 1 if possible, and conclude with Sector 0 to ensure that checksum is written last.
- Erasing sector 0 first, to invalidate checksum. OK
- Sector 1: ...............................................................................................
- Sector 2: ...........................................................
- Sector 0: ..............................................................................................
- Download Finished... taking 1 seconds
- Now launching the code
将开发板退出ISP模式,并转到RESET状态: - $ i2cset 1 0x27 0x02 0xF7 // set GPIO 0.2 to high and GPIO 0.3 to low
取消RESET: - $ i2cset 1 0x27 0x02 0xFF// set GPIO 0.2 and GPIO 0.3 to high
现在新的二进制文件应该在NXP微控制器上运行了。我们使用了一个简单的LED闪烁程序作为测试。测试的源码可以在这里下载:lpc21isp source code for iMX6
|