|
输入上拉(Input Pullup Serial) 本示例展示了pinMode()函数中的INPUT_PULLUP用法。通过在USB口建立Arduino和计算机之间的串行通信来监测按键的状态。 另外,当输入引脚为高电平HIGH时,和13脚相连的板载LED会点亮;当输入引脚为低电平LOW时,LED会熄灭。
所需硬件 - Arduino或者Genuino开发板 - 按钮开关 - 面包板 - 导线
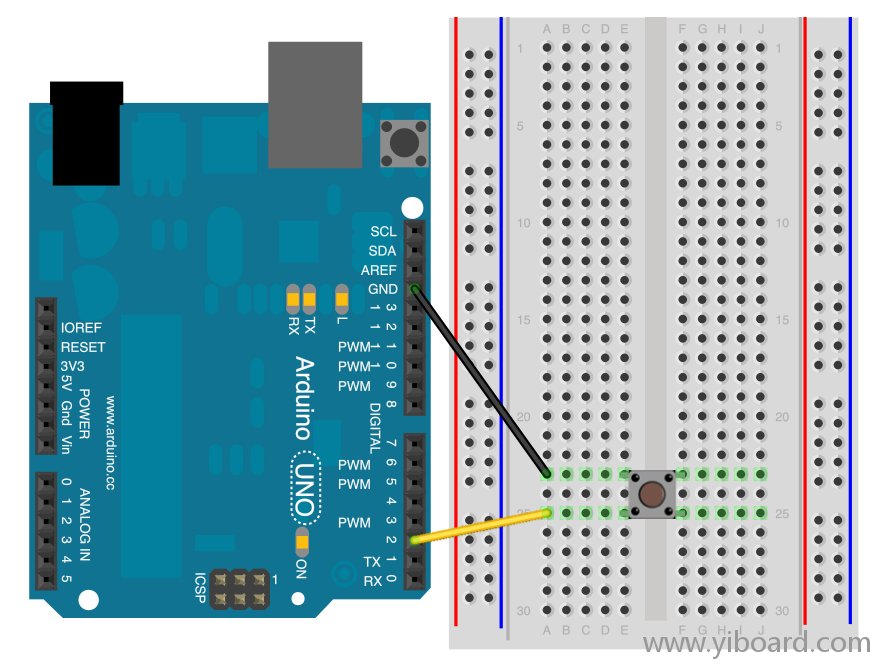
电路连接方式

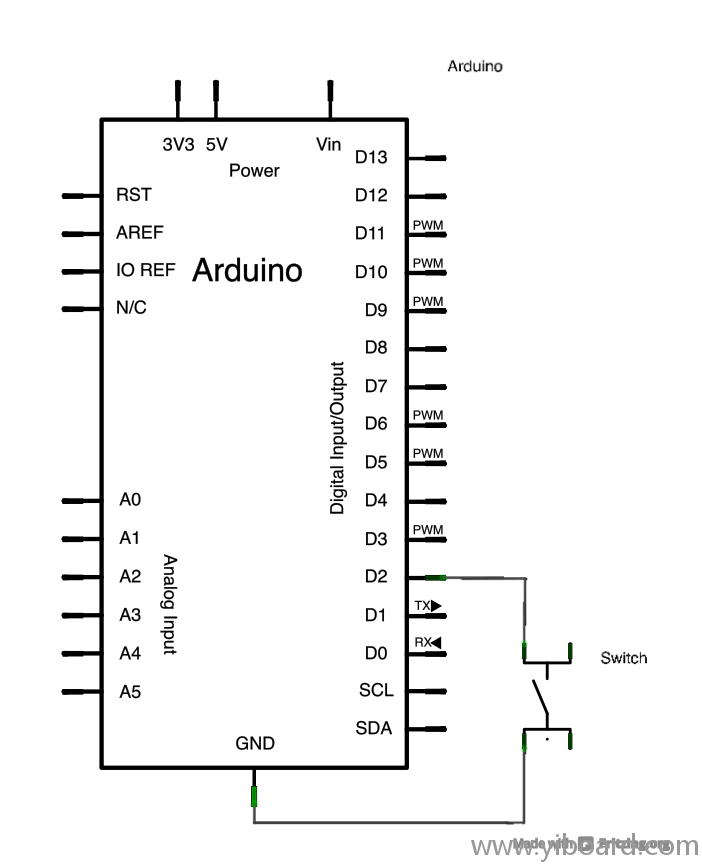
连接两根导线到Arduino开发板。用黑色导线将地连接到按键的一脚。第二根导线将数字2脚连接到按键的另一个引脚。 当按下按键或开关时,电路的两端连接在一起。当按键断开(未按下)时,按键两端没有连接。由于2脚的内部上拉电阻已经激活,并连接到5V,读取时为高电平HIGH。当按键闭合时,Ardunio读取为低电平,因为该引脚连接到地。
原理图

代码 下面的程序中,在setup函数需要做的第一件事情就是建立Arduino开发板与计算机之间的串行通信,波特率为9600,使用以下操作:
然后,初始化数字2脚为输入引脚,并启用内部上拉电阻:
下面的代码是将连接板载LED的13脚设置为输出模式:
现在setup函数已经设置完成了,看一下程序的主循环部分。当按键未按下时,内部的上拉电阻连接到5V。Arduino读取时为1或者高电平。当按键按下时,Arduino引脚被拉到地,读取时为0或低电平。 需要在程序的主循环做的第一件事是创建一个变量,保存按键的状态值。由于按键的值可能是1或0,所以可以使用int类型定义。将该变量命名为sensorValue,并设置该值等于从数字2脚读取的值。可以使用以下代码实现这些: - int sensorValue = digitalRead(2);
Arduino读取完输入信号后,将其以十进制(DEC)的方式打印输出到计算机。可以使用代码 Serial.println()实现: - Serial.println(sensorValue, DEC);
现在,当你打开Arduino开发环境中的串口监视器,当按键闭合时就可以看到一串的0,或者按键断开时看到一串的1。
当按键返回值为高电平时,13脚的LED点亮;当按键返回值为低电平时,LED熄灭。 - /*
- Input Pullup Serial
- This example demonstrates the use of pinMode(INPUT_PULLUP). It reads a
- digital input on pin 2 and prints the results to the serial monitor.
- The circuit:
- * Momentary switch attached from pin 2 to ground
- * Built-in LED on pin 13
- Unlike pinMode(INPUT), there is no pull-down resistor necessary. An internal
- 20K-ohm resistor is pulled to 5V. This configuration causes the input to
- read HIGH when the switch is open, and LOW when it is closed.
- created 14 March 2012
- by Scott Fitzgerald
- http://www.arduino.cc/en/Tutorial/InputPullupSerial
- This example code is in the public domain
- */
- void setup() {
- //start serial connection
- Serial.begin(9600);
- //configure pin2 as an input and enable the internal pull-up resistor
- pinMode(2, INPUT_PULLUP);
- pinMode(13, OUTPUT);
- }
- void loop() {
- //read the pushbutton value into a variable
- int sensorVal = digitalRead(2);
- //print out the value of the pushbutton
- Serial.println(sensorVal);
- // Keep in mind the pullup means the pushbutton's
- // logic is inverted. It goes HIGH when it's open,
- // and LOW when it's pressed. Turn on pin 13 when the
- // button's pressed, and off when it's not:
- if (sensorVal == HIGH) {
- digitalWrite(13, LOW);
- } else {
- digitalWrite(13, HIGH);
- }
- }
|