|
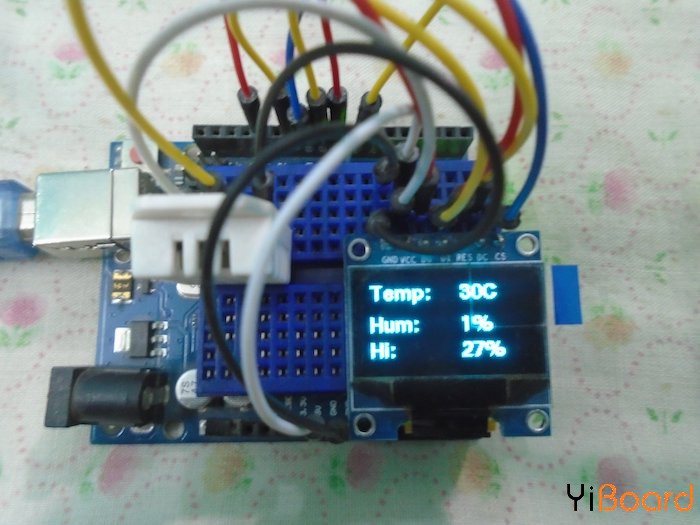
在本篇文章中,我们将使用Arduino开发板制作一个带有OLED显示屏的温度计和湿度计。我们将从DHT22传感器读取温度和湿度,然后在OLED屏上显示数据。
OLED表示有机发光二极管,它们有许多不同的尺寸。我们要使用的尺寸是128X64(1.3英寸)。 OLED通过SPI或I2C通信与Arduino配合使用,但在本文中,我们使用的是SPI通信。

所需的硬件 ● Arduino Uno开发板 ● 单色OLED显示屏12864 ● DHT22温湿度传感器 ● 连接导线 ● 面包板
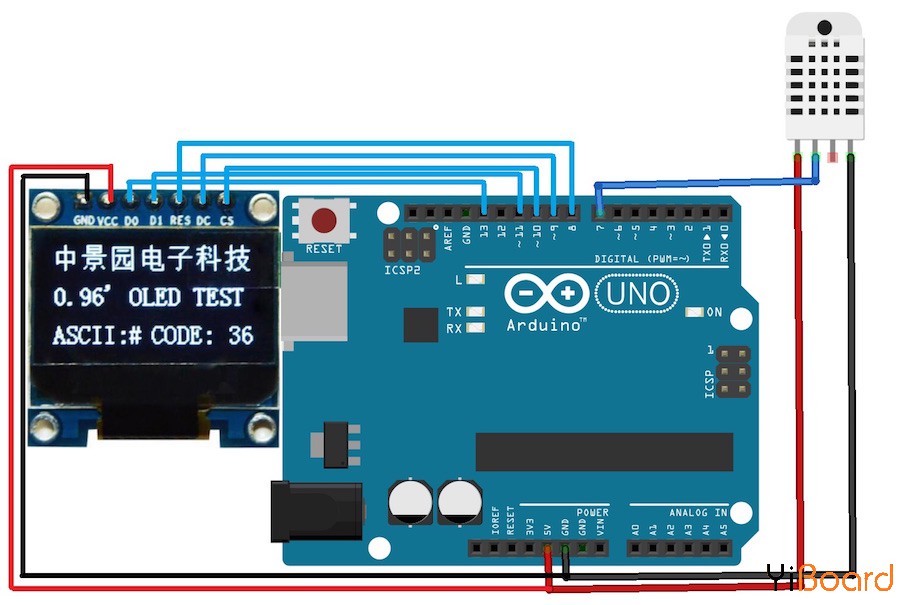
电路原理图 首先,我们将OLED与Arduino开发板连接起来。 OLED可以连接到Arduino中的I2C和SPI引脚。以I2C方式连接OLED的连接更容易,但SPI通信比I2C快。因此,我们将使用SPI将OLED与Arduino连接起来。使用Arduino连接OLED,如下所示: ◾ 将OLED上的CS引脚连接到Arduino上的引脚10 ◾ 将OLED上的DC引脚连接到Arduino上的引脚9 ◾ 将OLED上的RST引脚连接到Arduino上的引脚8 ◾ 将OLED上的D1或CLK引脚连接到Arduino上的引脚11 ◾ 将OLED上的D0或DIN引脚连接到Arduino上的引脚13
我们已将OLED连接到引脚13、11、10、9和8,因为这些引脚用于SPI通信。接下来,将DHT22与Arduino连接。 DHT22传感器与Arduino的连接如下: ◾ 将DHT22上的VCC连接到Arduino上的5V引脚 ◾ 将DHT22上的GND连接到Arduino上的GND ◾ 将DHT22的数据引脚连接到Arduino上的引脚7

代码说明 首先,我们包含用于DHT22传感器和OLED的库。 'U8glib'库用于OLED,它使代码非常容易。 我们将使用'U8glib'库的函数在OLED上显示数据。 - #include
- #include "DHT.h"
接下来,我们定义了连接DHT22传感器数据引脚的引脚,然后定义了DHT传感器的类型。 市场上还有一些其他类型的DHT传感器。 之后,我们初始化了连接OLED的引脚。 - #define DHTPIN 7
- #define DHTTYPE DHT22
- DHT sensor(DHTPIN, DHTTYPE);
- U8GLIB_SH1106_128X64 oled(13, 11, 10, 9, 8);
在setup()函数中,我们给出命令以开始从DHT22传感器接收值。 然后我们设置字体并在OLED上打印“Welcome to DIYHACKING”,,并持续5秒钟。 如果您不喜欢,可以更改字体大小。 您可以在此处找到不同的字体大小。 - sensor.begin();
- oled.firstPage();
- do
- {
- oled.setFont(u8g_font_fur14); //setting the font size
- //Printing the data on the OLED
- oled.drawStr(20, 15, "Welcome");
- oled.drawStr(40, 40, "To");
- oled.drawStr(5, 60, "DIYHACKING");
- } while( oled.nextPage() );
- delay(5000);
- }
在loop()函数中,我们从DHT22传感器读取湿度和温度值,然后使用温度和湿度计算热指数。 - float h = sensor.readHumidity(); //Reading the humidity value
- float t = sensor.readTemperature(); //Reading the temperature value
- float fah = sensor.readTemperature(true); //Reading the temperature in Fahrenheit
- if (isnan(h) || isnan(t) || isnan(fah)) { //Checking if we are receiving the values or not
- Serial.println("Failed to read from DHT sensor!");
- return;
- float heat_index = sensor.computeHeatIndex(fah, h); //Calculating the heat index in Fahrenheit
- float heat_indexC = sensor.convertFtoC(heat_index); //Calculating the heat index in Celsius
最后,我们再次设置字体大小并在OLED上打印温度、湿度和热指数。 您可以按照上面讨论的链接更改字体大小,也可以在不同的位置设置数据。 - oled.firstPage();
- do
- {
- oled.setFont(u8g_font_fub11); //setting the font size
- //Printing the data on the OLED
- oled.drawStr(0, 15, "Temp: ");
- oled.drawStr(0, 40, "Hum: ");
- oled.drawStr(0, 60, "Hi: ");
- oled.setPrintPos(72, 15); //setting the dimensions to print the temperature
- oled.print(t, 0);
- oled.println("C");
- oled.setPrintPos(72, 40); //setting the dimensions to print the humidity
- oled.print(h, 0);
- oled.println("%");
- oled.setPrintPos(72, 60); //setting the dimensions to print the heat index
- oled.print(heat_indexC, 0);
- oled.println("%");
- }
- while( oled.nextPage() );
- delay(2000);
- }
Arduino代码 以下是本篇文章使用的完整代码:
 main.rar
(771 Bytes, 下载次数: 236)
|