|
Arduino机械臂代码 由于代码有点长,为了更好地理解,我将分段解释程序的源代码。 在本文的末尾处,我将列出完整的源代码。
首先,我们需要包含SoftwareSerial库,用于蓝牙模块的串行通信和servo库。 这两个库都包含在Arduino IDE中,因此您无需从外部安装它们。 然后我们需要定义六个伺服电机、HC-05蓝牙模块和一些用于存储伺服电机当前和先前位置的变量,以及用于存储自动模式的位置或步骤的数组。 - #include <SoftwareSerial.h>
- #include <Servo.h>
- Servo servo01;
- Servo servo02;
- Servo servo03;
- Servo servo04;
- Servo servo05;
- Servo servo06;
- SoftwareSerial Bluetooth(3, 4); // Arduino(RX, TX) - HC-05 Bluetooth (TX, RX)
- int servo1Pos, servo2Pos, servo3Pos, servo4Pos, servo5Pos, servo6Pos; // current position
- int servo1PPos, servo2PPos, servo3PPos, servo4PPos, servo5PPos, servo6PPos; // previous position
- int servo01SP[50], servo02SP[50], servo03SP[50], servo04SP[50], servo05SP[50], servo06SP[50]; // for storing positions/steps
- int speedDelay = 20;
- int index = 0;
- String dataIn = "";
在setup()函数中,我们需要初始化伺服电机和蓝牙模块,并将机械臂移动到其初始位置。 我们使用write()函数来做到这一点,它只是将伺服电机移动到0到180度的任何位置。 - void setup() {
- servo01.attach(5);
- servo02.attach(6);
- servo03.attach(7);
- servo04.attach(8);
- servo05.attach(9);
- servo06.attach(10);
- Bluetooth.begin(38400); // Default baud rate of the Bluetooth module
- Bluetooth.setTimeout(1);
- delay(20);
- // Robot arm initial position
- servo1PPos = 90;
- servo01.write(servo1PPos);
- servo2PPos = 150;
- servo02.write(servo2PPos);
- servo3PPos = 35;
- servo03.write(servo3PPos);
- servo4PPos = 140;
- servo04.write(servo4PPos);
- servo5PPos = 85;
- servo05.write(servo5PPos);
- servo6PPos = 80;
- servo06.write(servo6PPos);
- }
接下来,在loop()函数中,使用Bluetooth.available()函数,我们不断检查是否有智能手机传入的数据。 如果为true,则使用readString()函数将数据读取为字符串并将其存储到dataIn变量中。 根据到达的数据,我们将告诉机械臂该做什么。 - // Check for incoming data
- if (Bluetooth.available() > 0) {
- dataIn = Bluetooth.readString(); // Read the data as string
Arduino机械臂控制Android应用程序 我们现在来看看Android应用程序,看看它实际发送给Arduino开发板的数据类型。

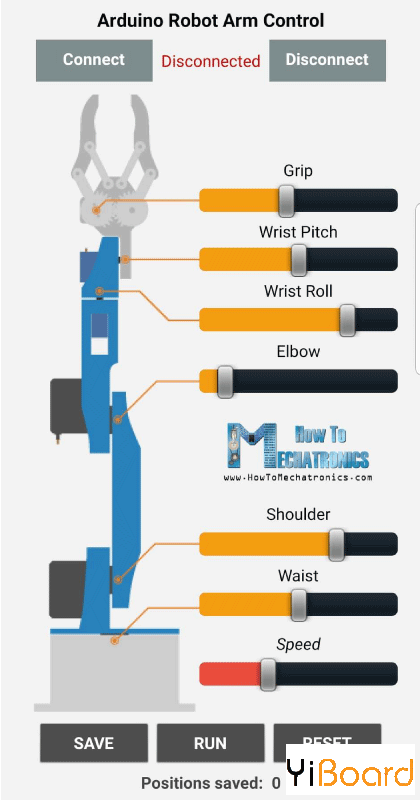
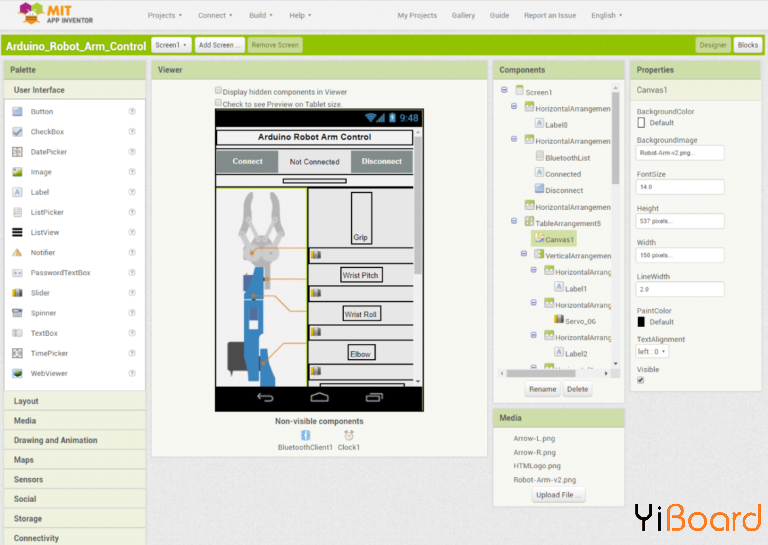
我使用MIT App Inventor在线应用程序制作了该应用程序,以下是它的工作原理。在顶部,我们有两个按钮,用于将智能手机连接到HC-05蓝牙模块。然后在左侧我们有一个机械臂的图像,在右侧我们有六个用于控制伺服电机的滑块和一个用于速度控制的滑块。

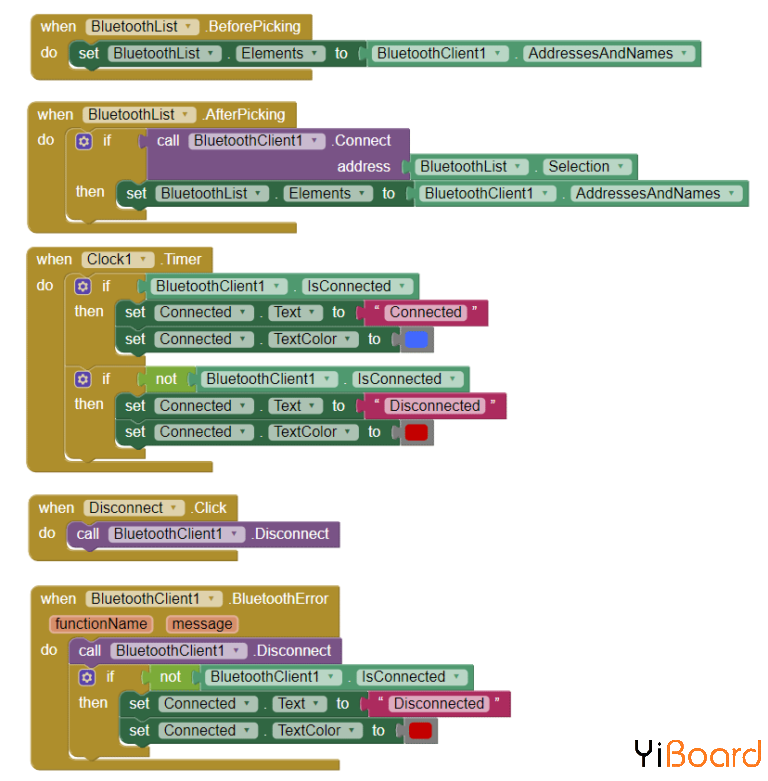
每个滑块都有适合机械臂关节的不同的初始值、最小值和最大值。在应用程序的底部,我们有三个按钮:SAVE、RUN和RESET,通过它我们可以编程机械臂使其实现自动运行。下面还有一个标签,显示我们保存的步骤数。 现在让我们看看应用程序背后的程序或模块。首先,在左侧,我们有用于将智能手机连接到蓝牙模块的模块。

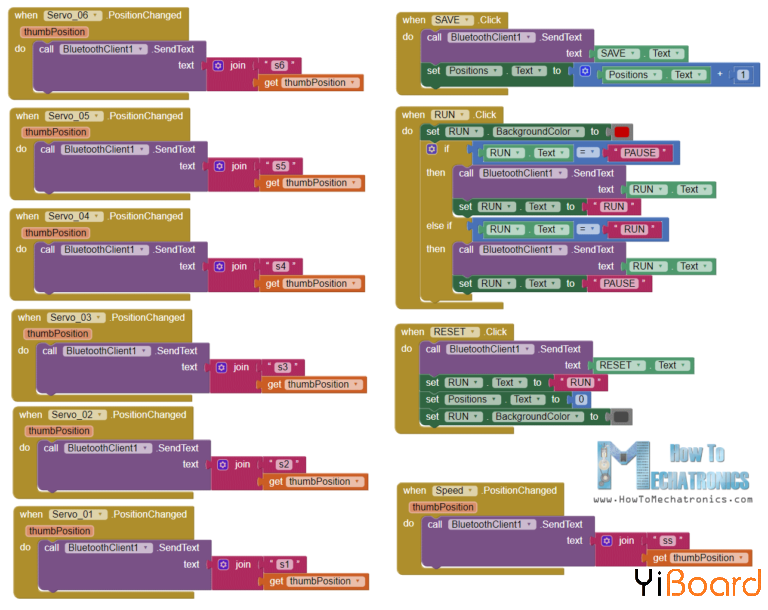
然后我们有用于伺服位置控制的滑块和用于编程机械臂的按钮块。因此,如果我们更改滑块的位置,通过使用蓝牙函数.SendText,我们会向Arduino开发板发送一段文本。该文本由一个前缀组成,该前缀指示哪个滑块被更改以及滑块的当前值。

以下是上述的MIT App Inventor项目的下载文件:
● Arduino机械臂控制MIT App Inventor项目文件:
 Arduino_Robot_Arm_Control.rar
(24.15 KB, 下载次数: 390)
因此,在Arduino中,使用startsWith()函数,我们检查每个传入数据的前缀,这样就可以知道接下来要做什么。例如,如果前缀是“s1”,我们知道需要移动伺服编号1。使用substring()函数得到剩余的文本,或者是位置值,我们将其转换为整数并使用该值将伺服电机移动到该位置。 - // If "Waist" slider has changed value - Move Servo 1 to position
- if (dataIn.startsWith("s1")) {
- String dataInS = dataIn.substring(2, dataIn.length()); // Extract only the number. E.g. from "s1120" to "120"
- servo1Pos = dataInS.toInt(); // Convert the string into integer
在这里我们可以简单地调用write()函数,然后伺服将转到该位置,但是这样伺服将以其最大速度运行,这对于机械臂来说太快了。 相反,我们需要控制伺服的速度,所以我使用了一些FOR循环,以便通过在每次迭代之间实现延迟时间来逐渐将伺服从前一个位置移动到当前位置。 通过改变延迟时间,您可以改变伺服的速度。 - // We use for loops so we can control the speed of the servo
- // If previous position is bigger then current position
- if (servo1PPos > servo1Pos) {
- for ( int j = servo1PPos; j >= servo1Pos; j--) { // Run servo down
- servo01.write(j);
- delay(20); // defines the speed at which the servo rotates
- }
- }
- // If previous position is smaller then current position
- if (servo1PPos < servo1Pos) {
- for ( int j = servo1PPos; j <= servo1Pos; j++) { // Run servo up
- servo01.write(j);
- delay(20);
- }
- }
- servo1PPos = servo1Pos; // set current position as previous position
- }
相同的方法适用于驱动机械臂的每个轴。
在它们下面是SAVE按钮。 如果我们按下SAVE按钮,每个伺服电机的位置将存储在一个数组中。 每按一次,索引就会增加,因此数组会逐步填充。 - // If button "SAVE" is pressed
- if (dataIn.startsWith("SAVE")) {
- servo01SP[index] = servo1PPos; // save position into the array
- servo02SP[index] = servo2PPos;
- servo03SP[index] = servo3PPos;
- servo04SP[index] = servo4PPos;
- servo05SP[index] = servo5PPos;
- servo06SP[index] = servo6PPos;
- index++; // Increase the array index
- }
然后,如果我们按下RUN按钮,我们调用运行存储步骤的runservo()自定义函数。 我们来看看这个函数。 该函数中我们一遍又一遍地运行存储的步骤,直到我们按下RESET按钮。 使用FOR循环,我们遍历存储在数组中的所有位置,同时我们检查是否有来自智能手机的传入数据。 此数据可以是RUN / PAUSE按钮,用于暂停机器人,如果再次单击则继续自动执行。 此外,如果我们改变速度滑块位置,我们将使用该值来改变下面FOR循环中每次迭代之间的延迟时间,这将控制伺服电机的速度。 - // Automatic mode custom function - run the saved steps
- void runservo() {
- while (dataIn != "RESET") { // Run the steps over and over again until "RESET" button is pressed
- for (int i = 0; i <= index - 2; i++) { // Run through all steps(index)
- if (Bluetooth.available() > 0) { // Check for incomding data
- dataIn = Bluetooth.readString();
- if ( dataIn == "PAUSE") { // If button "PAUSE" is pressed
- while (dataIn != "RUN") { // Wait until "RUN" is pressed again
- if (Bluetooth.available() > 0) {
- dataIn = Bluetooth.readString();
- if ( dataIn == "RESET") {
- break;
- }
- }
- }
- }
- // If SPEED slider is changed
- if (dataIn.startsWith("ss")) {
- String dataInS = dataIn.substring(2, dataIn.length());
- speedDelay = dataInS.toInt(); // Change servo speed (delay time)
- }
- }
- // Servo 1
- if (servo01SP[i] == servo01SP[i + 1]) {
- }
- if (servo01SP[i] > servo01SP[i + 1]) {
- for ( int j = servo01SP[i]; j >= servo01SP[i + 1]; j--) {
- servo01.write(j);
- delay(speedDelay);
- }
- }
- if (servo01SP[i] < servo01SP[i + 1]) {
- for ( int j = servo01SP[i]; j <= servo01SP[i + 1]; j++) {
- servo01.write(j);
- delay(speedDelay);
- }
- }
在上文中已经解释过这些IF语句和FOR循环,使用相同的方式,我们将伺服电机移动到下一个位置。 最后,如果我们按下RESET按钮,将清除数组中的所有数据到零,并将索引重置为零,这样我们就可以用新的动作重新编程机械臂。 - // If button "RESET" is pressed
- if ( dataIn == "RESET") {
- memset(servo01SP, 0, sizeof(servo01SP)); // Clear the array data to 0
- memset(servo02SP, 0, sizeof(servo02SP));
- memset(servo03SP, 0, sizeof(servo03SP));
- memset(servo04SP, 0, sizeof(servo04SP));
- memset(servo05SP, 0, sizeof(servo05SP));
- memset(servo06SP, 0, sizeof(servo06SP));
- index = 0; // Index to 0
- }
整篇文章就是这样,现在我们可以好好享受机械臂带来的乐趣。
以下是Arduino机械臂的完整代码:
 main.rar
(1.81 KB, 下载次数: 464)
|