旧乡故客
发表于: 2018-7-24 10:24:34 | 显示全部楼层

本系列文章主要介绍如何使用Silicon Labs微控制器的SMBus外设设计一个I2C接口。共包含两个部分:

●    第一部分:I2C的基本概念

●    第二部分:I2C设计示例实践


本篇文章主要介绍基于Silicon Labs微控制器的SMBus外设的I2C接口的固件架构和示例代码。


I2C状态机

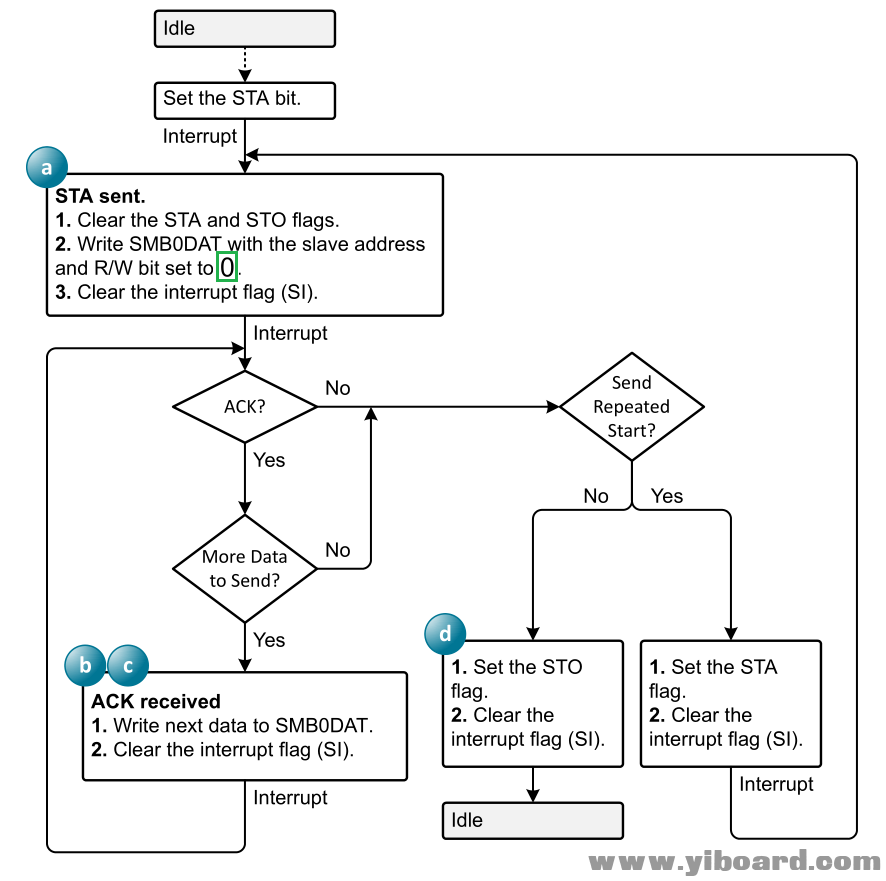
在上一篇文章中,我们讨论了以精心组织的状态机的形式实现I2C固件的重要性,其中从一个状态到另一个状态的进展对应于特定I2C事务所需的事件序列。我们还强调了SMBus中断标志是确保硬件事件和固件例程之间正确交互的关键。以下是主机/写操作的事件序列和状态机图:
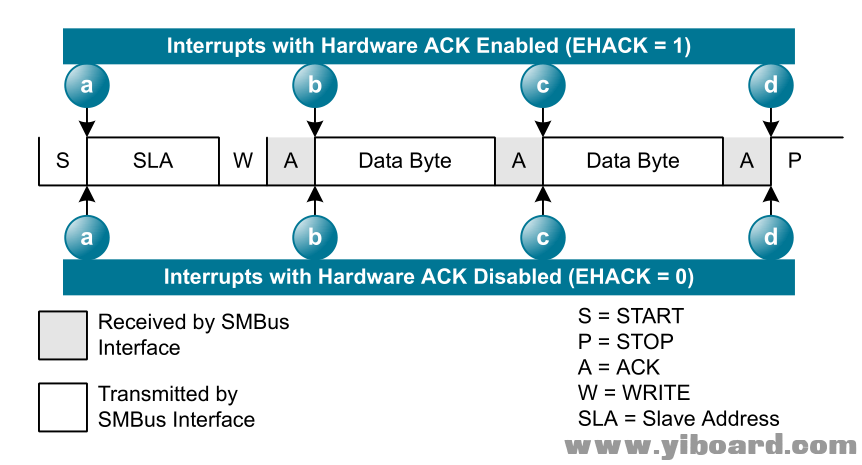
IC24_datasheet1.PNG

IC24_datasheet2.PNG


轮询还是中断?

当然可以通过轮询(即“手动”检查)SMBus中断标志来实现该流程图,并且一旦硬件设置了标志就继续I2C执行。这种方法可能稍微简单一些,但总的来说,轮询完全不如中断驱动的架构。首先,基于中断的技术鼓励设计人员编写可靠、结构良好、可扩展的代码。此外,轮询是低效的,因为处理器在整个事务期间不可用于其他任务;这对于I2C来说尤其成问题,因为该协议经常使用低时钟频率。


例如,假设您有一个主/写事务,您需要将5个字节传输到从设备。在包含“从地址+ R / W”字节后,总共有6个字节。每个字节需要9个时钟周期(字节本身为8个,ACK / NACK为1个),总共54个时钟周期。假设您使用的是100 kHz时钟,根据官方I2C规范,它实际上是在“标准模式”下运行时允许的最大时钟频率。此事务所需的总时间为

Ttrans = 1100kHz×54个周期= 0.54ms


看上去觉得这时间不是很长,但对于运行在25 MHz的EFM8微控制器来说,可以在120 ns或更短的时间内执行大多数指令。假设“固件中断”部分 - 例如,检查ACK / NACK位、访问数据阵列、清除事务中每个事件的中断标志 - 需要大约20个汇编指令。我们可以通过假设这个6字节的事务需要7个这样的20个指令处理干预来进行粗略的处理时间估计。

TCPU =(7×20指令)×120ns = 0.017ms

⇒TCPU/Ttrans= 0.017 ms/0.54 ms = 0.031


因此,与I2C相关的处理器执行仅需要约3%的总事务时间。换句话说,如果您使用中断驱动的体系结构,则97%的事务时间可用于其他处理任务。在这个高性能、低功耗嵌入式设备时代,效率的提高尤其重要。现今,单个微控制器可能需要与多个设备连接,同时还与主机通信并最大限度地降低功耗。


从流程图到代码

Silicon Labs提供的详细I2C流程图使得从图表到固件的转换变得相当容易。大多数I2C操作都发生在中断服务程序(ISR)中,如下所示:

  1. //-----------------------------------------------------------------------------
  2. // SMBUS0_ISR
  3. //-----------------------------------------------------------------------------
  4. //
  5. // SMBUS0 ISR Content goes here. Remember to clear flag bits:
  6. // SMB0CN0::SI (SMBus Interrupt Flag)
  7. //
  8. //-----------------------------------------------------------------------------
  9. SI_INTERRUPT (SMBUS0_ISR, SMBUS0_IRQn)
  10. {
  11.         SFRPAGE_SAVE = SFRPAGE;
  12.         SFRPAGE = SMB0_PAGE;

  13.         switch(I2C_State)
  14.         {
  15.                 //Master Read===================================================
  16.                 case ...
  17.                         ...        
  18.                         ...
  19.                         ...

  20.                 //Master Write===================================================
  21.                 case ...
  22.                         ...
  23.                         ...
  24.                         ...
  25.         }

  26.         SFRPAGE = SFRPAGE_SAVE;
  27. }
复制代码

此摘录显示了ISR的整体结构。 请注意,SFR(特殊功能寄存器)保存在ISR的开头并在结束时恢复。 这是一种很好的做法,但只有在您的设备没有自动将SFR保存/恢复纳入中断处理程序时才是必须的。 ISR的其余部分由与需要处理的任何I2C事务类型中的事件相对应的代码块组成。 根据I2C_State变量的值执行适当的代码块。 我们使用预处理器定义来帮助我们跟踪各种状态:

  1. #define MstR_STA_SENT 1
  2. #define MstR_ADDR_SENT 2
  3. #define MstR_READ_BYTE 3
  4. #define MstR_DATA_READY 4

  5. #define MstW_STA_SENT 10
  6. #define MstW_ADDR_SENT 11
  7. #define MstW_BYTE_SENT 12
复制代码

请注意,事务类型(master / write或master / read)包含在状态的整体特征中。 这就是为什么我们只能使用一个switch语句来实现各种类型I2C事务的固件程序。 但是,通过这种安排,您的一个全面的switch语句可能会变得有点笨拙,因此在您的ISR中,最好使用注释来可视化地组织不同的部分(例如,主/读,主/写,从/读,从/写) 。


以下代码摘录提供了有关如何实现主/读和主/写功能的指导。

  1. switch(I2C_State)
  2. {
  3.         //Master Read===================================================
  4.                 //start condition transmitted
  5.         case MstR_STA_SENT:
  6.                 SMB0CN0_STA = 0;        //clear start-condition bit
  7.                 SMB0CN0_STO = 0;        //make sure that stop-condition bit is cleared
  8.                 SMB0DAT = (I2C_SlaveAddr<<1)|BIT0;        //combine slave address with R/nW = 1
  9.                 I2C_State = MstR_ADDR_SENT;                //set state variable to next state
  10.                 SMB0CN0_SI = 0;        //clear interrupt flag
  11.                 break;

  12.                 //master transmitted "address + R/W" byte
  13.         case MstR_ADDR_SENT:
  14.                 if(SMB0CN0_ACK == I2C_NACK)        //if slave did not ACK
  15.                 {
  16.                         //cancel transmission and release bus, as follows:
  17.                         SMB0CN0_STO = 1;        //transmit stop condition
  18.                         I2C_State = IDLE;        //set current state as IDLE
  19.                 }
  20.                 else        //if slave ACKed
  21.                 {
  22.                         if(I2C_NumReadBytes == 1)        //if only one byte will be read
  23.                         {
  24.                                 //master NACKs next byte to say "stop transmitting"
  25.                                 SMB0CN0_ACK = I2C_NACK;
  26.                         }
  27.                         else        //if more than one byte will be read
  28.                         {
  29.                                 //master ACKs next byte to say "continue transmitting"
  30.                                 SMB0CN0_ACK = I2C_ACK;
  31.                         }
  32.                         RcvdByteCount = 0;        //this variable will be an index for storing received bytes in an array
  33.                         I2C_State = MstR_READ_BYTE;        //set next state
  34.                 }
  35.                 SMB0CN0_SI = 0;        //clear interrupt flag
  36.                 break;

  37.                 //master received a byte
  38.         case MstR_READ_BYTE:
  39.                 I2C_RcvData[RcvdByteCount] = SMB0DAT;        //store received byte
  40.                 RcvdByteCount++;        //increment byte counter (which is also the array index)
  41.                 SMB0CN0_SI = 0;        //clear interrupt flag

  42.                 if(RcvdByteCount == I2C_NumReadBytes)        //if this was the final byte
  43.                 {
  44.                         //release bus, as follows:
  45.                         SMB0CN0_STO = 1;        //transmit stop condition
  46.                         SMB0CN0_SI = 0;        //clear interrupt flag
  47.                         I2C_State = MstR_DATA_READY;        //this state tells the while loop in main() that the received data is ready
  48.                 }
  49.                 else if(RcvdByteCount == (I2C_NumReadBytes-1))        //if the next byte is the final byte
  50.                 {
  51.                         SMB0CN0_ACK = I2C_NACK;        //master NACKs next byte to say "stop transmitting"
  52.                 }
  53.                 else
  54.                 {
  55.                         SMB0CN0_ACK = I2C_ACK;        //master ACKs next byte to say "continue transmitting"
  56.                 }
  57.                 break;
  58. }
复制代码
  1. switch(I2C_State)
  2. {
  3.         //Master Write===================================================
  4.                 //start condition transmitted
  5.         case MstW_STA_SENT:
  6.                 SMB0CN0_STA = 0;        //clear start-condition bit
  7.                 SMB0CN0_STO = 0;        //make sure that stop-condition bit is cleared
  8.                 SMB0DAT = (I2C_SlaveAddr<<1);        //combine slave address with R/nW = 0
  9.                 I2C_State = MstW_ADDR_SENT;        //set state variable to next state
  10.                 SMB0CN0_SI = 0;        //clear interrupt flag
  11.                 break;

  12.                 //master transmitted "address + R/W" byte
  13.         case MstW_ADDR_SENT:
  14.                 if(SMB0CN0_ACK == I2C_NACK)        //if slave did not ACK
  15.                 {
  16.                         //cancel transmission and release bus, as follows:
  17.                         SMB0CN0_STO = 1;        //transmit stop condition
  18.                         I2C_State = IDLE;        //set current state as IDLE
  19.                 }
  20.                 else        //if slave ACKed
  21.                 {
  22.                         SMB0DAT = *I2C_WriteBufferPtr;        //write first byte to SMBus data register
  23.                         I2C_State = MstW_BYTE_SENT;        //set next state
  24.                 }
  25.                 SMB0CN0_SI = 0;        //clear interrupt flag
  26.                 break;

  27.                 //master transmitted a byte
  28.         case MstW_BYTE_SENT:
  29.                 if(SMB0CN0_ACK == I2C_NACK)        //if slave NACKed
  30.                 {
  31.                         //stop transmission and release bus, as follows:
  32.                         SMB0CN0_STO = 1;        //transmit stop condition
  33.                         I2C_State = IDLE;        //set current state as IDLE
  34.                 }
  35.                 //if slave ACKed and this was the final byte
  36.                 else if(I2C_WriteBufferPtr == I2C_FinalWriteAddress)
  37.                 {
  38.                         SMB0CN0_STO = 1;        //transmit stop condition
  39.                         I2C_State = IDLE;        //set current state as IDLE
  40.                 }
  41.                 //if slave ACKed and this was not the final byte
  42.                 else
  43.                 {
  44.                         I2C_WriteBufferPtr++;        //increment pointer that points at data to be transmitted
  45.                         SMB0DAT = *I2C_WriteBufferPtr;        //write next byte to SMBus data register
  46.                 }
  47.                 SMB0CN0_SI = 0;        //clear interrupt flag
  48.                 break;
  49. }
复制代码

在主/读过程中,请注意在接收到相关字节之前(通过SMBus控制寄存器中的ACK / NACK位)设置ACK / NACK响应。 因此,此特定实现应与启用的硬件ACK功能一起使用。

跳转到指定楼层
旧乡故客
发表于: 2018-7-24 10:28:05 | 显示全部楼层

不仅仅是ISR

SMBus ISR中的状态机绝对是I2C实现中的关注焦点,但您仍需要启动事务并设置必要的变量。 有多种方法可以做到这一点,有些方法比其他方式更优雅、更复杂或可扩展。 以下代码演示了一种有效,方便的方法。

  1. unsigned char I2C_State = IDLE;        //state variable is initialized to IDLE
  2. unsigned char I2C_SlaveAddr;        //global variable for current slave address
  3. unsigned char I2C_NumReadBytes;        //number of bytes to be read
  4. unsigned char idata *I2C_WriteBufferPtr;        //pointer to bytes to be transmitted
  5. unsigned char I2C_FinalWriteAddress;        //ISR uses this to determine which byte is the final byte

  6. //these "transaction arrays" contain all the information needed for a particular I2C transaction
  7. unsigned char idata SLAVE1_Tx_EnableSensing[4] = {SLAVE1_ADDR, 2, 0x42, 0x10};
  8. unsigned char idata SLAVE1_Tx_SetReadFirstRegAddr[3] = {SLAVE1_ADDR, 1, 0x40};
  9. unsigned char idata SLAVE2_Tx_SetReadTempData[3] = {SLAVE2_ADDR, 1, 0x50};
  10. unsigned char idata SLAVE2_Rx_TempData[3] = {SLAVE2_ADDR, 9};


  11. void I2C_MasterWrite(unsigned char* PtrtoCmdBuffer)        //function argument is simply the name of the transaction array
  12. {
  13.         I2C_State = MstW_STA_SENT;        //first state is "start condition generated"
  14.         I2C_SlaveAddr = PtrtoCmdBuffer[0];        //copy the slave address from the transaction array to the global variable
  15.         I2C_WriteBufferPtr = PtrtoCmdBuffer + 2;        //set the address of the first data byte in the transaction array
  16.         I2C_FinalWriteAddress = I2C_WriteBufferPtr + (PtrtoCmdBuffer[1] - 1);        //set the final address based on the number of bytes to be transmitted

  17.         SFRPAGE = SMB0_PAGE;
  18.         SMB0CN0_STA = 1;        //initiate the transaction by setting the start-condition bit
  19. }

  20. void I2C_MasterRead(unsigned char* PtrtoCmdBuffer)        //function argument is simply the name of the transaction array
  21. {
  22.         I2C_State = MstR_STA_SENT;        //first state is "start condition generated"
  23.         I2C_SlaveAddr = PtrtoCmdBuffer[0];        //copy the slave address from the transaction array to the global variable
  24.         I2C_NumReadBytes = PtrtoCmdBuffer[1];        //copy the number of bytes to be read from the transaction array to the global variable

  25.         SFRPAGE = SMB0_PAGE;
  26.         SMB0CN0_STA = 1;        //initiate the transaction by setting the start-condition bit
  27. }
复制代码

这种策略的关键是“事务数组”。为任何特定应用程序所需的每个特定I2C事务准备一个数组;该数组包含一个事务的所有相关信息,并且该信息通过全局变量传递给ISR。在这个例子中,数组的格式如下:对于主/写操作,我们使用{从地址,要传输的字节数,第一个数据字节,第二个数据字节,第三个数据字节,。 。 }。对于主/读操作,它是{从地址,要读取的字节数}。您只需使用相应的事务数组标识符作为单个参数调用I2C_MasterWrite()或I2C_MasterRead()函数。


请注意,事务数组和指针使用“idata”关键字声明。这确保数组存储在EFM8的内部RAM中,以及编译器知道指针指向存储在内部RAM中的变量。你必须要小心一点,因为内部RAM中的数据只能用一个字节来寻址,但“外部”(虽然通常是物理上片上)RAM中的数据是用两个字节寻址的。因此,单字节指针变量无法正确地处理外部RAM中的数据。 Simplicity Studio附带的Keil编译器应该能够对其进行排序并执行正确的指针初始化和转换,但最好真正理解您正在做的事情并相应地微调代码。


实际测量

在所有这些固件开发过程中,我们不要忘记,目标是生成实际的电信号。以下是一些I2C示波器捕捉截图。上部迹线是时钟,下部迹​​线是数据线。您会注意到当时钟为低电平时(即无效时钟状态)会发生一些意外的窄脉冲。发生这种情况是因为主设备停止驱动数据线以允许从设备发送ACK或NACK。从机在ACK确认时数据线保持低电平,但是当时钟返回到无效状态时,从机停止驱动数据线。这意味着在此时钟低电平期间,主机和从机都不驱动数据线,因此信号在主机再次驱动为低电平之前浮动到逻辑高电平。

I2C5_full_transaction.png

一个完整的事务:起始位、地址+ R / W、两个数据字节、停止位


I2C5_startbit.png

开始位


I2C5_stopbit.png

停止位


I2C5_stopbitthenstartbit.png

停止位紧接着是新事务的起始位


总结

本系列中提供的信息可帮助您有效地将流程图和事件序列转换为可靠、可扩展的EFM8固件。 上面给出的示例代码提供了I2C主控功能所需的大部分内容,您可以将此代码与从机的功能图结合使用,以开发从机/读操作和从机/写操作的固件。

回复

使用道具 举报

您需要登录后才可以回帖 登录 | 立即注册

本版积分规则

主题 29 | 回复: 32


手机版|

GMT+8, 2024-3-29 01:04 , Processed in 0.093253 second(s), 6 queries , Gzip On, MemCache On. Powered by Discuz! X3.5

YiBoard一板网 © 2015-2022 地址:河北省石家庄市长安区高营大街 ( 冀ICP备18020117号 )

快速回复 返回顶部 返回列表