|
无延时LED闪烁(Blink Without Delay)
有时你需要同时做两件事情。例如,您可能想要在点亮LED的同时读取按钮是否按下。在这种情况下,您不能使用delay(),因为在delay()时Arduino会暂停你的程序。如果Arduino在等待delay()暂停时按钮按下,那么你的程序将会错过按钮按下。
本示例演示了如何在不使用delay()来点亮LED。点亮LED,并记录下时间。然后,每次通过loop()时,检测是否已经超过设定的闪烁时间。如果是,则改变LED的打开或关断状态,并设定新的时间。通过这种方式,LED连续闪烁的同时示例执行不会错过任何一条指令。
打个比方,在微波炉进行加热比萨饼时,同时也等着一些重要的电子邮件。你将比萨饼放进微波炉中,并将其设置为10分钟。使用delay()类似于坐在微波炉前面看着定时器从10分钟计数到零。如果在此期间,重要邮件到达,你将会错过它。
在现实生活中你会加热比萨饼,然后检查你的电子邮件,然后也许做其他事(这并不需要太长时间!),并每隔一段时间你会回来看微波炉的定时器是否已经到零,表明您的比萨饼加热完成。
在本教程中,您将学习如何建立一个类似的定时器。
所需硬件 - Arduino或者Genuino开发板
- LED - 220欧电阻
电路连接方式

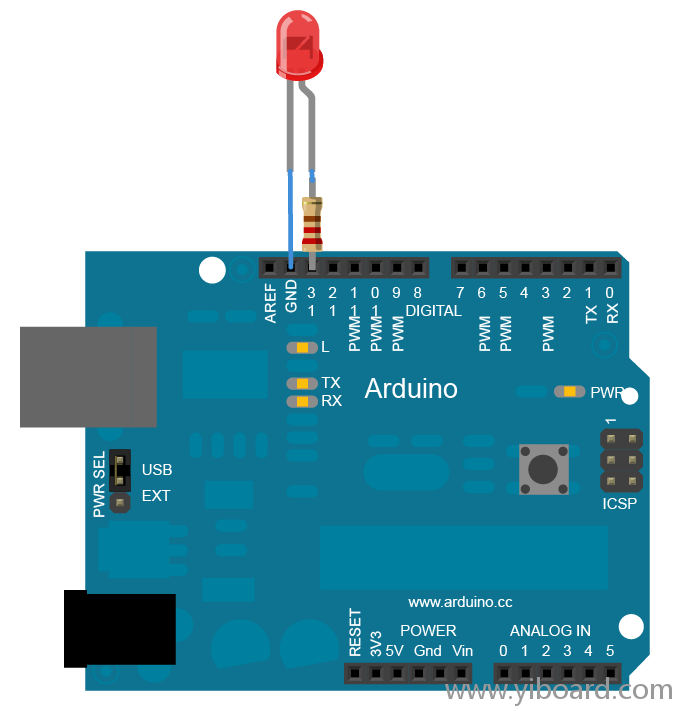
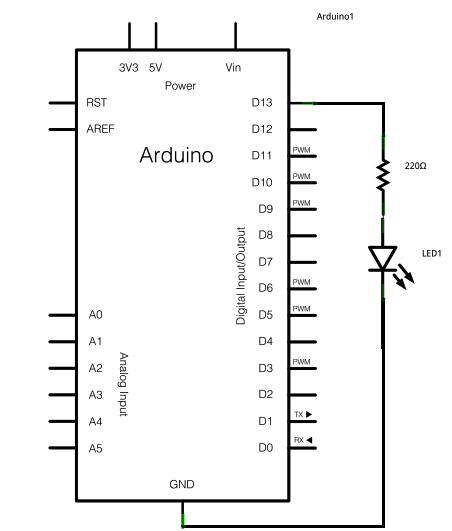
构建电路时,将电阻的一端连接到开发板的13脚。将LED的长引脚(正,称为阳极)连接到电阻的另一端。连接LED的短引脚(负,称为阴极)连接到开发板的GND,如上面的框图和下面的原理图所示。
大部分的Arduino和Genuino开发板在电路板的13脚已经连接一个LED。如果没有连接其他任何附加硬件运行这个例子,你会看到该LED闪烁。
原理图

电路搭建完成后,将开发板插入到计算机中,启动Arduino Software(IDE),然后输入以下代码。
代码 下面的代码使用mills()函数来点亮LED,该函数返回从开发板开始运行当前程序起的毫秒数。 - /* Blink without Delay
- Turns on and off a light emitting diode (LED) connected to a digital
- pin, without using the delay() function. This means that other code
- can run at the same time without being interrupted by the LED code.
- The circuit:
- * LED attached from pin 13 to ground.
- * Note: on most Arduinos, there is already an LED on the board
- that's attached to pin 13, so no hardware is needed for this example.
- created 2005
- by David A. Mellis
- modified 8 Feb 2010
- by Paul Stoffregen
- modified 11 Nov 2013
- by Scott Fitzgerald
- This example code is in the public domain.
- http://www.arduino.cc/en/Tutorial/BlinkWithoutDelay
- */
- // constants won't change. Used here to set a pin number :
- const int ledPin = 13; // the number of the LED pin
- // Variables will change :
- int ledState = LOW; // ledState used to set the LED
- // Generally, you should use "unsigned long" for variables that hold time
- // The value will quickly become too large for an int to store
- unsigned long previousMillis = 0; // will store last time LED was updated
- // constants won't change :
- const long interval = 1000; // interval at which to blink (milliseconds)
- void setup() {
- // set the digital pin as output:
- pinMode(ledPin, OUTPUT);
- }
- void loop() {
- // here is where you'd put code that needs to be running all the time.
- // check to see if it's time to blink the LED; that is, if the
- // difference between the current time and last time you blinked
- // the LED is bigger than the interval at which you want to
- // blink the LED.
- unsigned long currentMillis = millis();
- if (currentMillis - previousMillis >= interval) {
- // save the last time you blinked the LED
- previousMillis = currentMillis;
- // if the LED is off turn it on and vice-versa:
- if (ledState == LOW) {
- ledState = HIGH;
- } else {
- ledState = LOW;
- }
- // set the LED with the ledState of the variable:
- digitalWrite(ledPin, ledState);
- }
- }
|  |手机版|YiBoard一板网
( 冀ICP备18020117号 )