|
LED亮度渐变(Fade)
本示例展示了使用analogWrite() 来实现LED亮度的渐变。AnalogWrite采用脉冲宽度调制(PWM),以开关之间的不同比例快速打开和关闭一个数字引脚,来打造出渐变效果。
所需硬件
- Arduino或者Genuino开发板
- LED
- 220欧电阻
- 导线
- 实验电路板
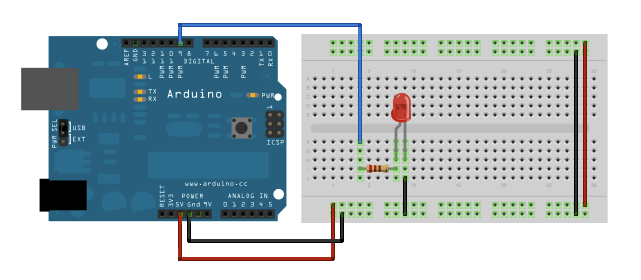
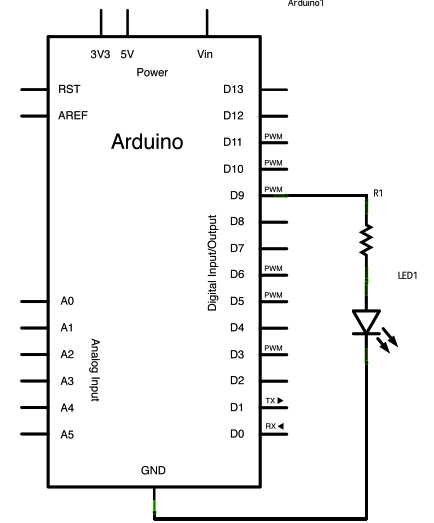
电路连接方式 将LED的阳极(较长的正极管脚)通过一个220欧电阻连接到开发板的数字输出9脚。将阴极(较短的负极管脚)直接连接到地。

原理图

代码 在声明9脚作为ledPin之后,代码的Setup()函数就不需要做什么了。
代码主循环中的analogWrite()函数需要两个参数:一个是要函数说明操作哪个引脚,一个说明向PWM写多少值。
为了使LED的熄灭和点亮出现渐变的效果,需要逐渐将PWM值从0(一直熄灭)增加255(一直点亮),然后再回到0完成循环。在下面的模板例程中,PWM值使用brightness变量来设置。循环每执行一次,变量fadeAmount的值增加。
如果brightness值处于是在任一极端(0或255),则fadeAmount改变为它的符号。换句话说,如果fadeAmount是5,那么它会被设为-5。如果它是-5,那么它会被设为5。下个循环时,也会更改fadeAmount的符号。
analogWrite()可以非常快速的改变PWM值,因此在模板例程最后的延迟控制渐变的速度。试着改变延迟值,看看它是如何影响渐变效果的。 - /*
- Fade
- This example shows how to fade an LED on pin 9
- using the analogWrite() function.
- The analogWrite() function uses PWM, so if
- you want to change the pin you're using, be
- sure to use another PWM capable pin. On most
- Arduino, the PWM pins are identified with
- a "~" sign, like ~3, ~5, ~6, ~9, ~10 and ~11.
- This example code is in the public domain.
- */
- int led = 9; // the PWM pin the LED is attached to
- int brightness = 0; // how bright the LED is
- int fadeAmount = 5; // how many points to fade the LED by
- // the setup routine runs once when you press reset:
- void setup() {
- // declare pin 9 to be an output:
- pinMode(led, OUTPUT);
- }
- // the loop routine runs over and over again forever:
- void loop() {
- // set the brightness of pin 9:
- analogWrite(led, brightness);
- // change the brightness for next time through the loop:
- brightness = brightness + fadeAmount;
- // reverse the direction of the fading at the ends of the fade:
- if (brightness == 0 || brightness == 255) {
- fadeAmount = -fadeAmount ;
- }
- // wait for 30 milliseconds to see the dimming effect
- delay(30);
- }
|  |手机版|YiBoard一板网
( 冀ICP备18020117号 )